
Introduction:
Google Maps is a map service provided by Google that supports a wide variety of configuration settings. Adding Google Maps to your application can provide users with more contextual information than a street address or set of coordinates.
Angular Google Maps are components that provide Angular applications with tools to utilize the Google Maps APIs. In this tutorial, you will use the @agm/core library and create a map with a marker and plotted with polygons.
Requirements:
To complete this tutorial, you will need:
- Node.js installed locally, which you can do by following How to Install Node.js and Create a Local Development Environment.
- Some familiarity with setting up an Angular project and using Angular components may be beneficial.
- A Google Maps JavasScript API Key.
- This will require a Google account.
- Signing into the Google Cloud Platform Console.
- Creating a new project.
- Enabling the Google Maps JavaScript API for the project.
- And creating credentials for an API Key.
Note: To avoid the “For development purposes only” messages when using the Google Maps API, you will need to provide a valid credit card and associate with a Billing account for the Google Cloud Project, but it is not required for this tutorial.
1. Create an API Key for your application:
To use the Maps JavaScript API in your application, you need to generate an API Key. API key is a unique identifier used to authenticate requests associated with the application.
Follow the steps mentioned here for getting an API Key:
Get an API Key | Maps JavaScript API | Google Developers
2. Create an Angular application and install the dependencies:
npm install @agm/core
AgmCoreModule.forRoot({
apiKey: <YOUR_API_KEY>,
libraries: [‘places’, ‘drawing’, ‘geometry’],
}),
4. Create a custom angular component to include agm-map component:
<agm-map class=“agm-map” [zoom]=“zoom” [latitude]=“userLatitude” [longitude]=“userLongitude”>
<agm-marker [latitude]=“userLatitude” [longitude]=“userLongitude” [markerDraggable]=“true”
(dragEnd)=“markerDragEnd($event)”></agm-marker>
</agm-map>
Initialize userLatitude and userLongitude with valid values in the ts file. This would define the center point of the initial view.
public userLongitude: number = 80.2591872;
5. Set a height for agm-map component:
This is important. If you miss this step, you won’t be able to see the map on the screen.
.agm-map {
height: 500px;
}
With the above steps done, the Google Maps UI should be showing up on the screen. The steps following this point are to enable drawing on the map.
6. Add declare statement for google:
Add the following line at the top of google-place.component.ts file after the import statements.
declare const google: any;
7. Add mapReady Event to agm-map component:
onMapReady(map: any) {
this.initDrawingManager(map);
}
8. Initialize drawing Manager:
const options = {
drawingControl: true,
drawingControlOptions: {
drawingModes: [‘polygon’],
},
polygonOptions: {
draggable: true,
editable: true,
},
drawingMode: google.maps.drawing.OverlayType.POLYGON,
};
this.drawingManager = new google.maps.drawing.DrawingManager(options);
9. Add event listeners:
The following are the major events you need to handle:
- overlaycomplete
Set on the drawing manager. It is invoked whenever a closed polygon is created on the map. - insert_at
Set on each point in the path. It is invoked whenever a new point is added to the polygon. - remove_at
Set on each point in the path. It is invoked whenever a point is removed from the polygon. - set_at
Set on each point in the path. It is invoked whenever a point in the polygon is edited.
Whenever overlaycomplete is invoked, that means the closed polygon is either created or updated. Once you get the points on the polygon, you need to add event listeners for the other three events (namely, insert_at, remove_at, set_at) mentioned above, for all the points.
10. Define variables to store the polygon coordinates and area:
Define an array to store the points which make up the polygon and another variable to store the area enclosed by the polygon.
pointList: { lat: number; lng: number }[] = [];
selectedArea = 0;
Whenever the events mentioned in step 9 get fired, you need to update the above two variables by calling the following function with event.overlay.getPath() as the parameter.
updatePointList(path: any) {
this.pointList = [];
const len = path.getLength();
for (let i = 0; i < len; i++) {
this.pointList.push(
path.getAt(i).toJSON()
);
}
this.selectedArea = google.maps.geometry.spherical.computeArea(
path
);
}
In order to compute the spherical area enclosed by the polygon, you need to use computeArea() function, which is available as part of the google maps module.
11. Limit the drawing to one polygon:
By default, you will be able to draw any number of polygons on the map. This can be prevented by setting the drawingMode to null once you complete creating one closed polygon.
self.drawingManager.setDrawingMode(null);
// To hide:
self.drawingManager.setOptions({
drawingControl: false,
});
With steps 8–10 completed, initDrawingManager() function would look like the following:
initDrawingManager = (map: any) => {
const self = this;
const options:any = {
drawingControl: true,
drawingControlOptions: {
drawingModes: [‘polygon’],
},
polygonOptions: {
draggable: true,
editable: true,
},
drawingMode: google.maps.drawing.OverlayType.POLYGON,
};
this.drawingManager = new google.maps.drawing.DrawingManager(options);
this.drawingManager.setMap(map);
google.maps.event.addListener(
this.drawingManager,
‘overlaycomplete’,
(event) => {
if (event.type === google.maps.drawing.OverlayType.POLYGON) {
const paths = event.overlay.getPaths();
for (let p = 0; p < paths.getLength(); p++) {
google.maps.event.addListener(
paths.getAt(p),
‘set_at’,
() => {
if (!event.overlay.drag) {
self.updatePointList(event.overlay.getPath());
}
}
);
google.maps.event.addListener(
paths.getAt(p),
‘insert_at’,
() => {
self.updatePointList(event.overlay.getPath());
}
);
google.maps.event.addListener(
paths.getAt(p),
‘remove_at’,
() => {
self.updatePointList(event.overlay.getPath());
}
);
}
self.updatePointList(event.overlay.getPath());
this.selectedShape = event.overlay;
this.selectedShape.type = event.type;
}
if (event.type !== google.maps.drawing.OverlayType.MARKER) {
// Switch back to non-drawing mode after drawing a shape.
self.drawingManager.setDrawingMode(null);
// To hide:
self.drawingManager.setOptions({
drawingControl: false,
});
}
}
);
}
12. Delete the current polygon:
If you wish to delete the current selection, you just need to set the map as null.
deleteSelectedShape() {
if (this.selectedShape) {
this.selectedShape.setMap(null);
this.selectedArea = 0;
this.pointList = [];
// To show:
this.drawingManager.setOptions({
drawingControl: true,
});
}
}
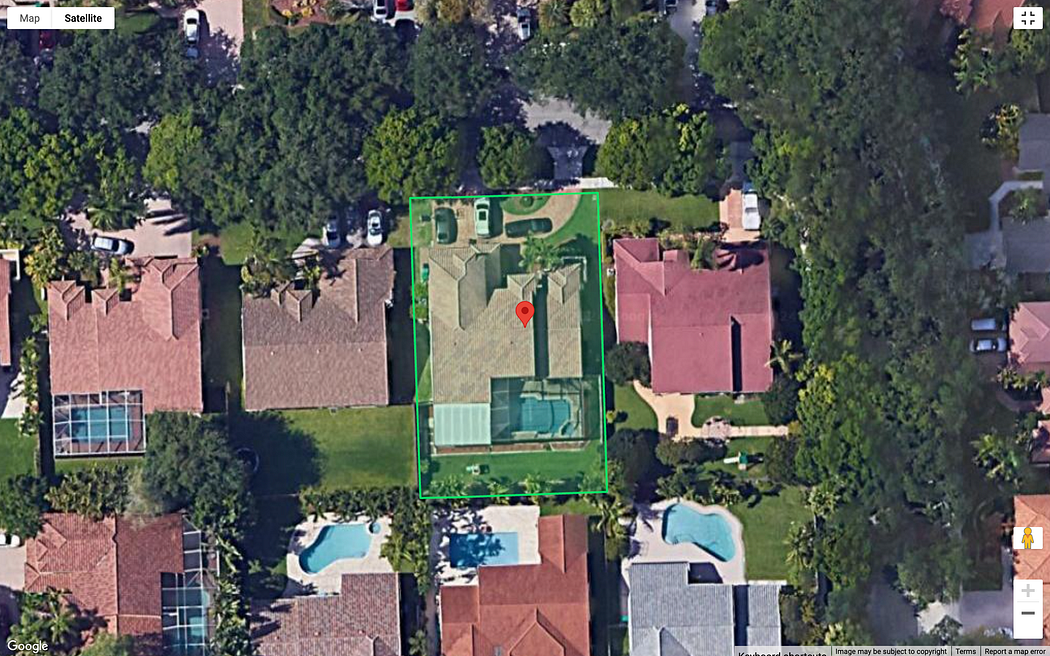
With the above steps done, the application would look similar to the following:

Faq's
How do I set up AGM in an Angular project to plot maps?
To integrate Angular Google Maps (AGM), install @agm/core, import AgmCoreModule.forRoot({ apiKey, libraries: [‘places’,’drawing’,’geometry’] }) in app.module.ts, and add the component with [latitude], [longitude], and [zoom] inputs. Don’t forget to set a CSS height (e.g., .agm-map { height: 500px; }) so your map renders correctly in the browser.
How can I enable drawing polygons on AGM maps in Angular?
To draw polygons, use the mapReady event to initialize a google.maps.drawing.DrawingManager with drawingControl and drawingModes: [‘polygon’]. After placing the drawing manager on the map, listen for overlaycomplete events—this captures the polygon overlay. Then add event listeners (insert_at, remove_at, set_at) on its path to track shape changes and coordinate updates dynamically.
How do I calculate and display the area of a drawn polygon?
Once you obtain the polygon’s path via event.overlay.getPath(), convert it to a coordinate array and compute its area using google.maps.geometry.spherical.computeArea(path). This method returns the polygon’s area in square meters, which you can store in a component variable and display on your UI for real-time feedback.
How can I allow editing and deleting of polygons in AGM?
You can make polygons editable and draggable by passing these options to your DrawingManager. To delete a polygon, call .setMap(null) on the Overlay reference, clear the area and point list variables, and re-enable drawing controls (drawingControlOptions) so users can draw a new shape.
What are best practices when plotting multiple polygons with AGM?
If you need to restrict the map to a single polygon, disable drawing controls after the first overlay (drawingManager.setDrawingMode(null) and hide the UI). For multiple shapes, track each overlay separately—store their paths, areas, and IDs in an array. Always clean up listeners and overlays to avoid memory leaks and ensure performance remains optimal.